External repositories
Infrahub supports two different types of connections to external Git repositories:
- Repository fully integrates with Git version control, including branch tracking and two-way branch synchronization.
- Read-only Repository links a particular branch in Infrahub to a particular ref in the Git repository. It will only read from the Git repository. It will never make any changes to the external repository.
Recommendations
- We recommend using a dedicated repository for Infrahub resources.
- We recommend configuring the branch
mainasdefault_branch. - Use
Read-only Repositorypreferably for slow-moving assets as pulling the changes is a manual operation (it works well with tagging a release and bumping the ref from release to release). - Use
Read-only Repositoryfor shared assets across multiple instances or repositories external to your organization.
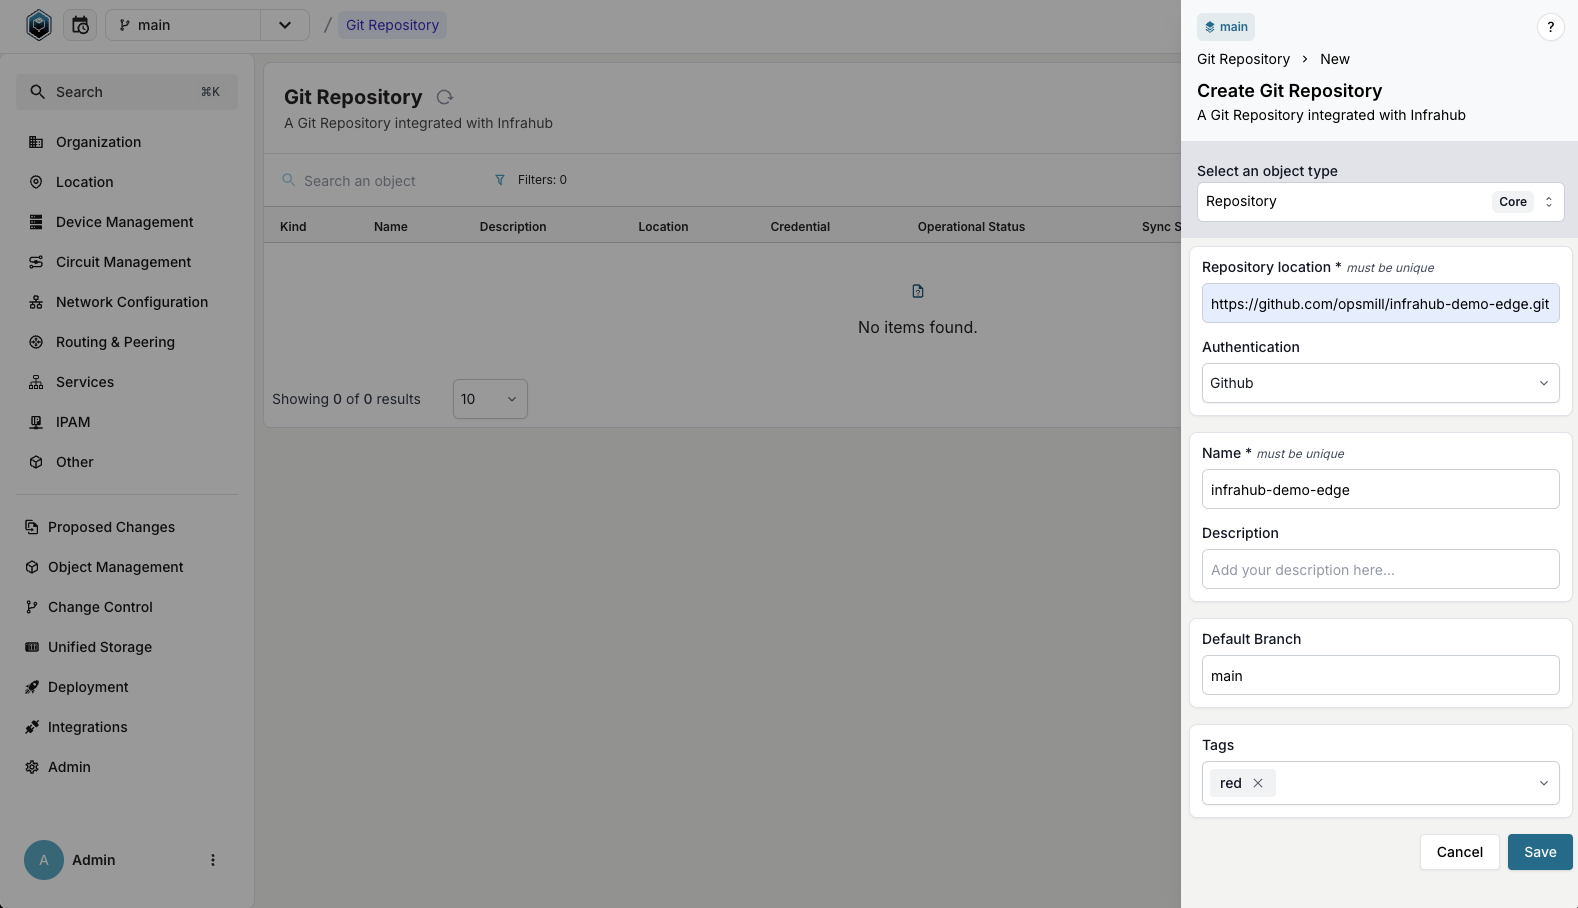
Adding a repository
To create a repository in Infrahub, you'll need to submit the following details:
- Repository location: The URL of the external repository (for example,
https://github.com/opsmill/infrahub.git). - Authentication: (Optional) A credential object containing your username/password or personal token.
- Name: The identifier you wish to assign to the repository in Infrahub.
- Description: (Optional) A comment or description about the repository.
- Ref: (Optional) A branch, tag, or commit reference to pull.
- Tags: (Optional) Any tags to associate with the repository.
- Via the Web Interface
- Via the GraphQL Interface
- Via the Infrahub SDK
Via the Web Interface
- Log in to the Infrahub UI.
- Go to Integrations > Git Repositories.
- Click on the + Add Git Repository button.
- Select the repository type.
- Complete the required information.
In the UI, you should see your new repository. If its Operational Status is Unknown, verify the location and credentials.
Via the GraphQL Interface
Using the GraphQL Interface, you can add a Repository or Read-only Repository via a Mutation.
- Open the GraphQL Interface.
- If needed (for example with a private repository), create a Credential object with your username and password/token:
# Endpoint: http://127.0.0.1:8000/graphql/main
mutation {
  CorePasswordCredentialCreate(
    data: {
      name: { value: "my-git-credential" },
      username: { value: "MY_USERNAME" },
      password: { value: "MY_TOKEN_OR_PASSWORD" }
    }
  ) {
    ok
    object {
      hfid
    }
  }
}
- Use one of the mutations below based on your repository type:
- Repository
- Read-only Repository
# Endpoint: http://127.0.0.1:8000/graphql/main
mutation {
  CoreRepositoryCreate(
    data: {
      name: { value: "My Git Repository" },
      location: { value: "https://GIT_SERVER/YOUR_GIT_USERNAME/YOUR_REPOSITORY_NAME.git" },
      # The HFID returned in step 2 will be used for the credentials
      credential: { hfid: "my-git-credential" }
    }
  ) {
    ok
    object {
      id
    }
  }
}
# Endpoint: http://127.0.0.1:8000/graphql/<branch>
mutation {
  CoreReadOnlyRepositoryCreate(
    data: {
      name: { value: "My Git Repository" },
      location: { value: "https://GIT_SERVER/YOUR_GIT_USERNAME/YOUR_REPOSITORY_NAME.git" },
      ref: { value: "BRANCH/TAG/COMMIT_TO_TRACK" },
      # Optional: use the credential created earlier
      credential: { hfid: "my-git-credential" }
    }
  ) {
    ok
    object {
      id
    }
  }
}
The repository should appear under Integrations / Git Repositories. If its Operational Status is Unknown, verify your repository’s location and credentials.
Via the Infrahub SDK
- Install and set up the Infrahub SDK.
- If your repository is private, create a Credential object with your username/password (recommended for Repository to allow branch creation):
# Create credential object ...
credential = client.create(
    "CorePasswordCredential",
    name="My Git Credential",
    username="MY_USERNAME",
    password="MY_TOKEN_OR_PASSWORD",
)
credential.save()
- Create the repository object:
- Repository
- Read-only Repository
# Create repository object ...
repository = client.create(
    "CoreRepository",
    name="My Git repository",
    location="https://GIT_SERVER/YOUR_GIT_USERNAME/YOUR_REPOSITORY_NAME.git",
    credential=credential,  # The credential object created above
)
repository.save()
# Create repository object ...
repository = client.create(
    "CoreReadOnlyRepository",
    name="My Git repository",
    location="https://GIT_SERVER/YOUR_GIT_USERNAME/YOUR_REPOSITORY_NAME.git",
    ref="BRANCH/TAG/COMMIT_TO_TRACK",
    credential=credential,  # Optional: use the credential created above
)
repository.save()
Pulling changes for read-only repository
Read-only Repository and Repository track remote changes differently. For further details, refer to the Repository Topic.
Unlike a Repository, Infrahub does not automatically update a Read-only Repository with remote changes. To update, you must change the ref value.
- Via the Web Interface
- Via the GraphQL Interface
Via the Web Interface
- Log in to the Infrahub UI.
- Go to Integrations > Git Repositories.
- Click on the desired
CoreReadOnlyRepositoryrecord. - Click on the Edit Read-Only Repository button.
- Change the
refwith the branch, tag, or commit reference to pull
Via the GraphQL Interface
- Open the GraphQL Interface.
- Use the mutation below, filling in the details:
# Endpoint: http://127.0.0.1:8000/graphql/main
mutation {
  CoreReadOnlyRepositoryUpdate(
    data: {
      hfid: ["My Git repository"],
      ref: { value: "BRANCH/TAG/COMMIT_TO_TRACK" }
    }
  ) {
    ok
    object {
      id
    }
  }
}
Troubleshooting repository
For troubleshooting, consult the Repository Status for potential issues. You can also view the low-level repository operations output from the UI:
- Log in to the Infrahub UI.
- Go to Integrations > Git Repositories.
- Select the relevant
CoreReadOnlyRepositoryrecord. - Click on the Tasks tab.
GitHub access token
If your repository is private on GitHub, you need an access token.
You can use either :
- a classic Personal Access Token
- a Fine-grained Access Token.
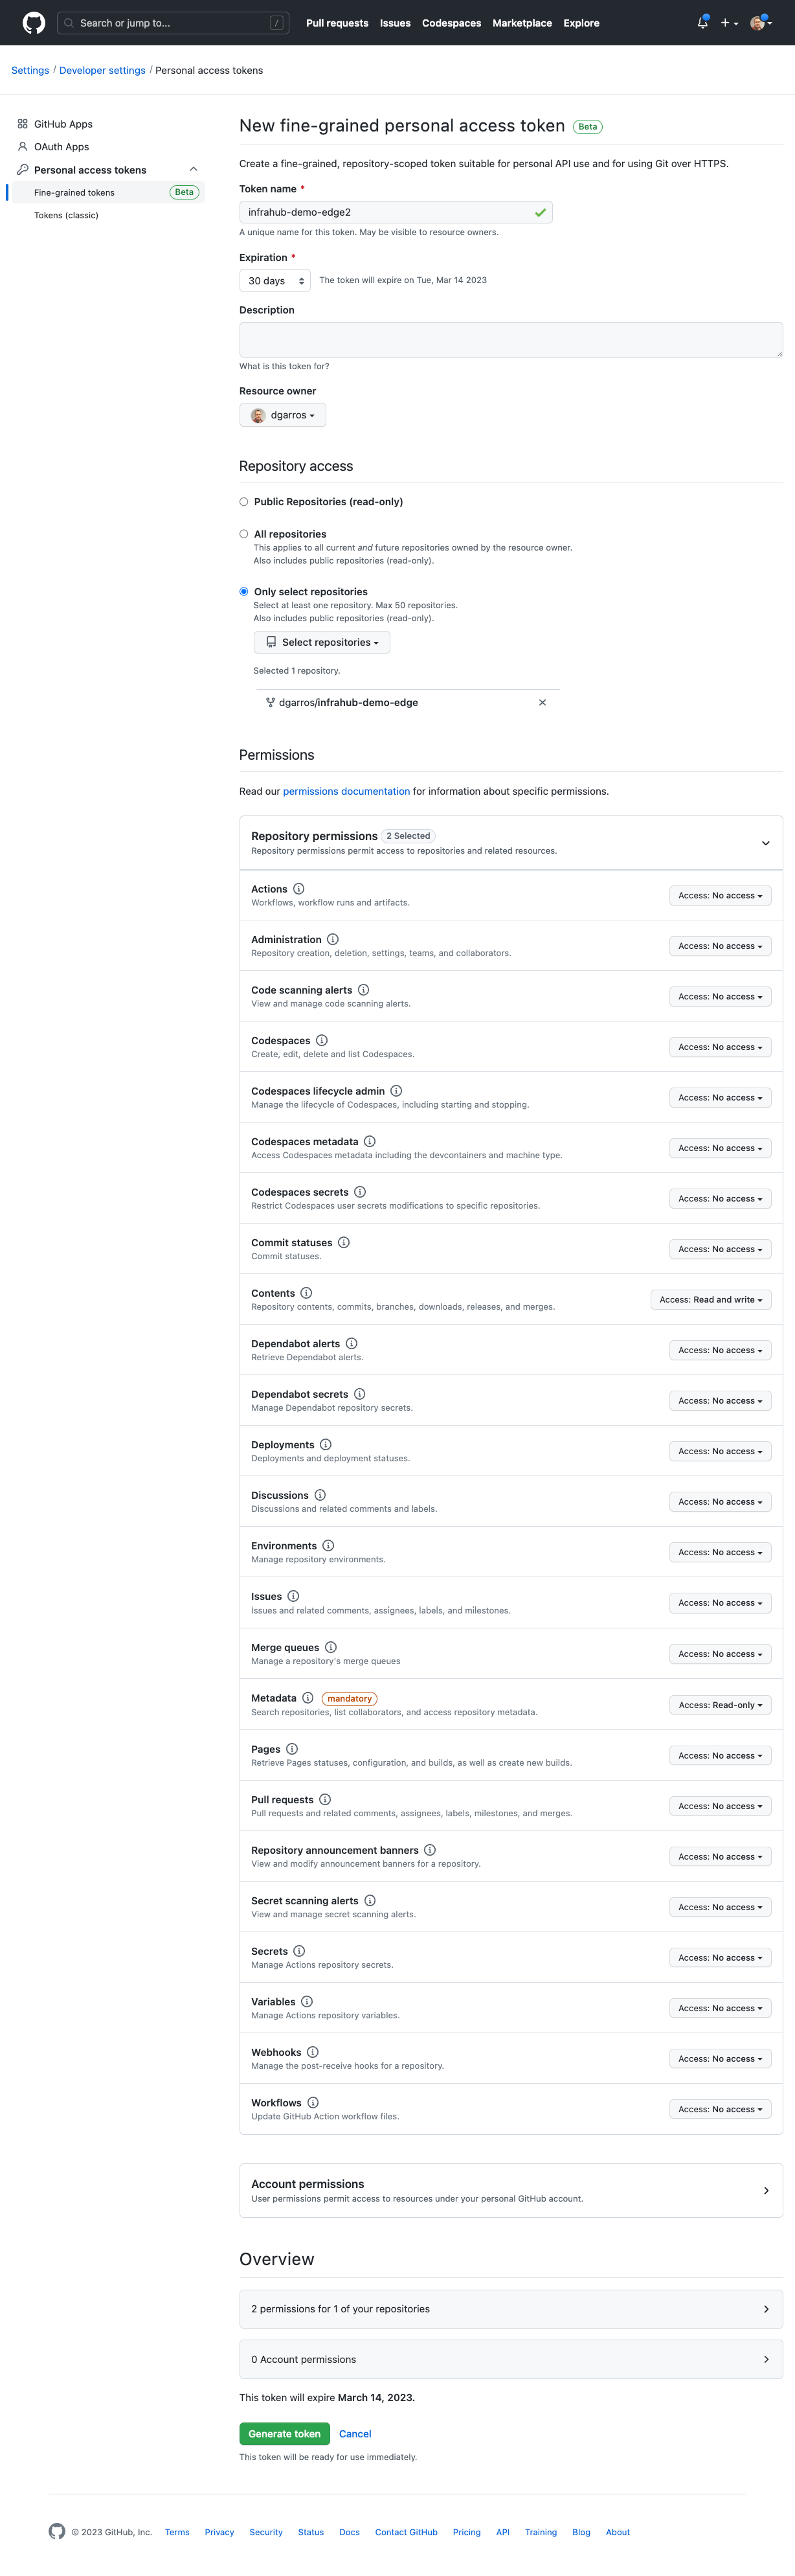
Generate a GitHub fine-grained personal access token
-
Go to Settings > Developer Settings > Personal access tokens > New GitHub token.
-
Select Fine-grained tokens.
-
Limit the scope under Repository Access > Only Select Repositories.
-
Grant the token permission:
- For a
Repository, grant Read/Write access to the repository content. - For a
Read-only Repository, grant Read access only.
- For a
GitLab access token
If your repository is private on GitLab, or if you want to setup a (non read-only) Repository, then we recommend to use a project access token.
Project access tokens are scoped to the project in GitLab.
You should select the read_repository scope for the access token if you want to set up the project as a ReadOnlyRepository.
For a normal Repository you should select the read_repository and write_repository scopes.
The role of the access token should be set to Developer or a role with similar permissions.
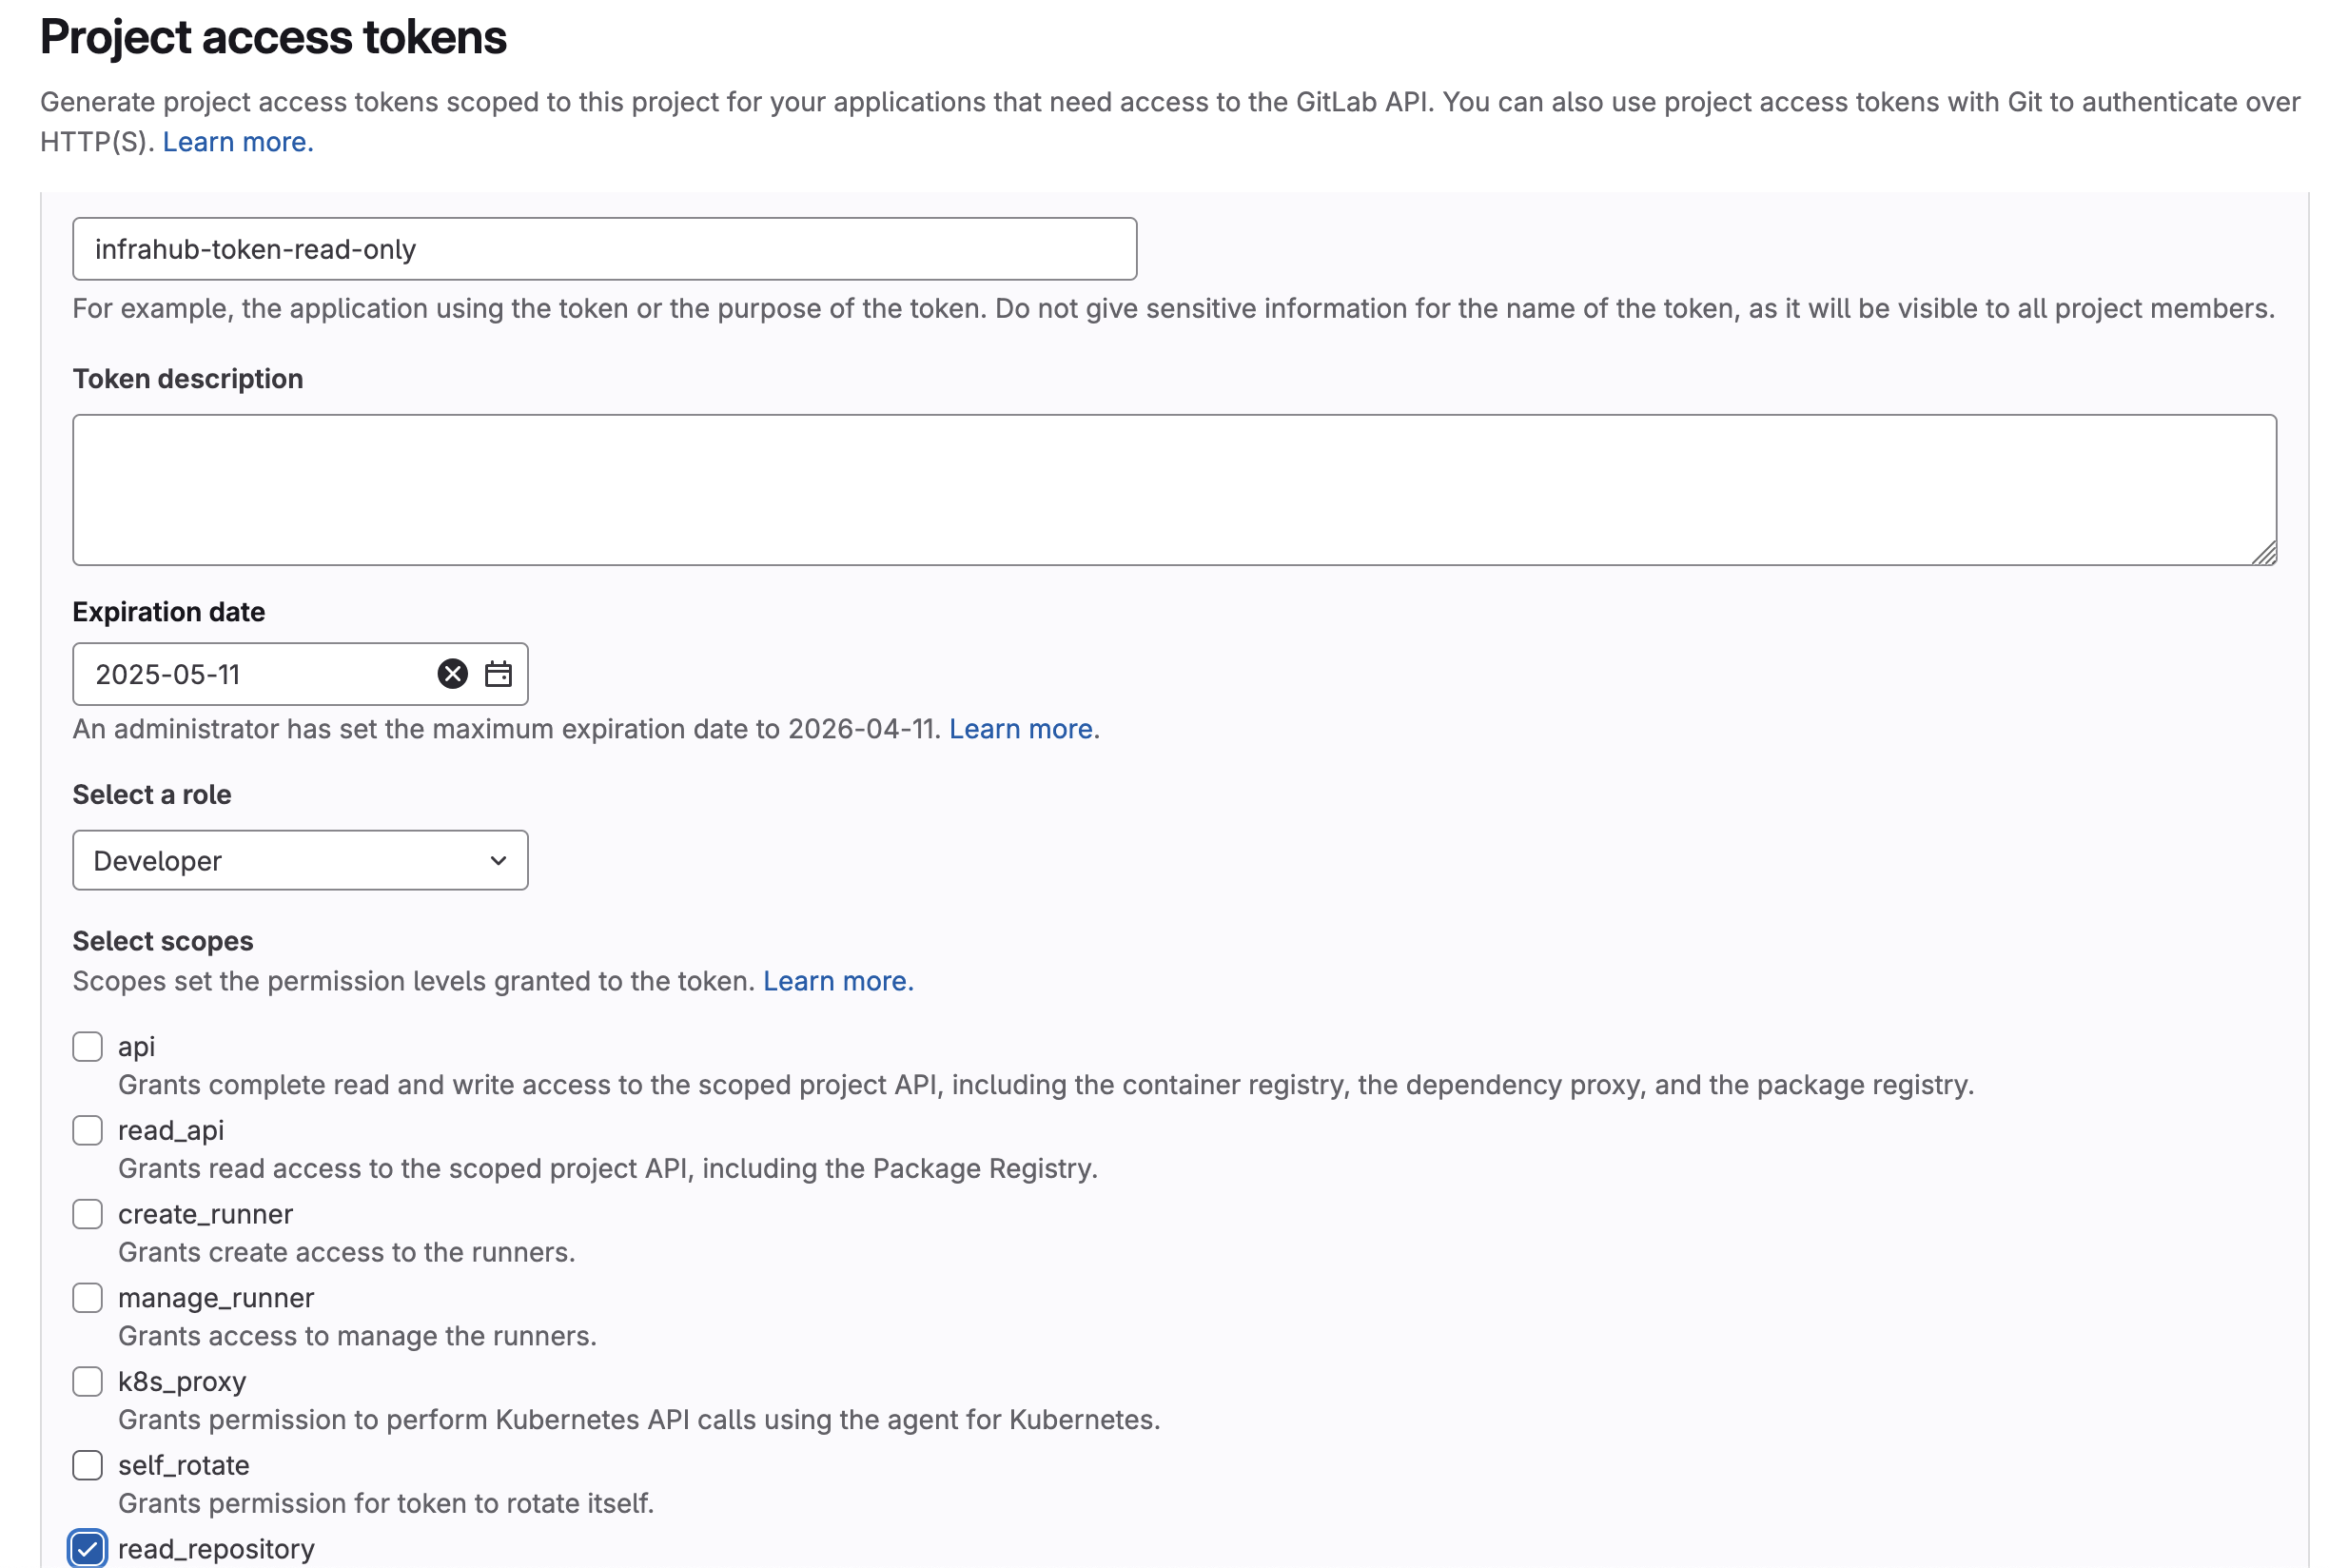
Generate a GitLab project access token
-
Navigate to the project in GitLab
-
In the project menu open Settings > Access tokens
-
Create a new token by pressing the Add new token button
-
Give the token a name, an optional description, and an optional expiration date
-
Set the role to
Developeror a role with similar permissions -
Select the scope of the project access token
- For a
Repository, select theread_repositoryandwrite_repositoryscopes - For a
Read-only Repository, select theread_repositoryscope
- For a
Personal access tokens, Impersonation tokens or using username/password could also work, depending on your setup. However we strongly advise against there usage as they are scoped to a user account and not a specific repository.
Installing custom CA certificates
If your Git server uses a certificate signed by an unknown CA, add the CA certificate as follows.
You will need to build a custom Docker image, and rebuild it with each new release.
- Save your CA certificate (and any intermediate certificates) in PEM format (such as
mycacertificate.crt). - Create a Dockerfile (in the same directory as your certificate):
ARG INFRAHUB_VERSION=latest
FROM registry.opsmill.io/opsmill/infrahub:${INFRAHUB_VERSION}

COPY mycacertificate.crt /usr/local/share/ca-certificates/
RUN update-ca-certificates
- Build the Docker image:
INFRAHUB_VERSION=latest && docker build --build-arg INFRAHUB_VERSION=$INFRAHUB_VERSION -f Dockerfile -t custom/infrahub:${INFRAHUB_VERSION} .
- Create a
docker-compose.override.ymlfile in thedevelopmentdirectory:
---
services:
  task-worker:
    image: custom/infrahub:latest
Start your development environment with the invoke demo.start command as explained in the Installing Infrahub guide.
Disable certificate verification
Disabling certificate validation is a BAD practice and is STRONGLY discouraged.
You will need to build a custom Docker image, and rebuild it with each new release.
- Create a Dockerfile on your local system:
ARG INFRAHUB_VERSION=latest
FROM registry.opsmill.io/opsmill/infrahub:${INFRAHUB_VERSION}

RUN git config --global http.sslVerify "false"
- Build the Docker image:
INFRAHUB_VERSION=latest && docker build --build-arg INFRAHUB_VERSION=$INFRAHUB_VERSION -f Dockerfile -t custom/infrahub:${INFRAHUB_VERSION} .
- Create a
docker-compose.override.ymlfile in thedevelopmentdirectory:
---
services:
  task-worker:
    image: custom/infrahub:latest
Start your environment with invoke demo.start as detailed in the Installing Infrahub guide.
Using a proxy server
In some cases, Infrahub’s git worker containers must connect through a proxy.
This method works only for HTTP(S) connections (SSH is not supported).
You will need to build a custom Docker image, and rebuild it with each new release.
- Create a Dockerfile. Update the proxy URL, replacing
user:passwordwith your credentials and modifying the FQDN/port as needed:
ARG INFRAHUB_VERSION=latest
FROM registry.opsmill.io/opsmill/infrahub:${INFRAHUB_VERSION}

RUN git config --global http.proxy http://user:password@internal.proxy:8080
- Build the Docker image:
INFRAHUB_VERSION=latest && docker build --build-arg INFRAHUB_VERSION=$INFRAHUB_VERSION -f Dockerfile -t custom/infrahub:${INFRAHUB_VERSION} .
- Create a
docker-compose.override.ymlfile in thedevelopmentdirectory:
---
services:
  task-worker:
    image: custom/infrahub:latest
Start your development environment with invoke demo.start as explained in the Installing Infrahub guide.